Setting up Detox Tests in a React Native App
- Javascript
- React Native
Detox is an end to end testing library for your react native app that enables you to emulate user behavior and test how your app reacts to it, automatically.
In this blog post, I will be going over setting up Detox from scratch in a React Native project for Android. In the future, I am planning to write another post where I will go through the iOS setup.
Setting up the Project
The first step is to set up our React Native project. I am assuming you already have your development environment setup for react native and android. If not, then you can go through the official documentation to set up your environment.
We will be using react-native cli for this. The following steps should bootstrap a react-native app.
$ npx react-native init ReactNativeDetox
$ cd ReactNativeDetox
First, you should have your android emulator running, and then you can run the following to start the ReactNativeDetox app in your emulator.
$ yarn android
$ yarn start
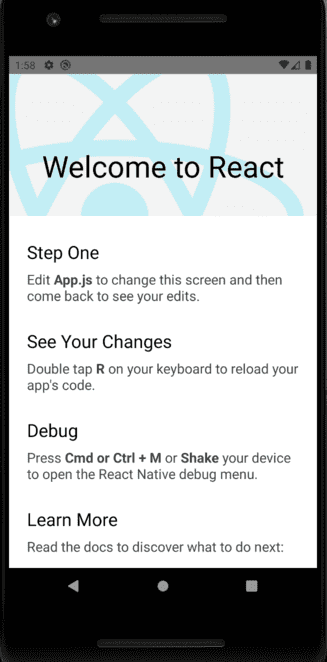
yarn android will take a while to complete and it should ask you to run the metro bundler but in case it doesn't you can do that manually by running yarn start. After running those command the app should look like the following screenshot.

Adding Detox
Detox needs to be set up with a test runner like Jest or Mocha. It supports both but I am going to be using Jest for this tutorial since its recommended by Detox themselves.
First, we need to install detox locally from npm.
$ yarn add detox
Now we need to setup Detox with Jest. Thankfully, we don't have to do this on our own. The Detox cli can do this for us.
$ npx detox init -r jest

detox[43072] INFO:  [init.js] Created a file at path: e2e/config.json
detox[43072] INFO:  [init.js] Created a file at path: e2e/environment.js
detox[43072] INFO:  [init.js] Created a file at path: e2e/firstTest.e2e.js
detox[43072] INFO:  [init.js] Created a file at path: e2e/config.json
After running the above command, Detox will create four files for us. For the scope of this tutorial, we don't need to be concerned with e2e/config.json and e2e/environment.js. But if you are interested you can read about them here.
You will also need to install jest and jest-circus as dev dependencies.
$ yarn add jest jest-circus
Editing .detoxrc.json
First, you need to find out the name of the emulator you are running. You can do that by running the following -
$ emulator -list-avds

Pixel_2_API_29
As you can see, my emulator name is Pixel_2_API_29.
Now, you will need to replace the configuration object in .detoxrc.json file with the following -
  "configurations": {
    "android.emu.debug": {
      "binaryPath": "android/app/build/outputs/apk/debug/app-debug.apk",
      "build": "cd android ; ./gradlew assembleDebug assembleAndroidTest -DtestBuildType=debug ; cd -",
      "type": "android.emulator",
      "device": {
        "avdName": "YOUR_EMULATOR_NAME"
      }
    },
    "android.emu.release": {
      "binaryPath": "android/app/build/outputs/apk/release/app-release.apk",
      "build": "cd android ; ./gradlew assembleRelease assembleAndroidTest -DtestBuildType=release ; cd -",
      "type": "android.emulator",
      "device": {
        "avdName": "YOUR_EMULATOR_NAME"
      }
    }
  }
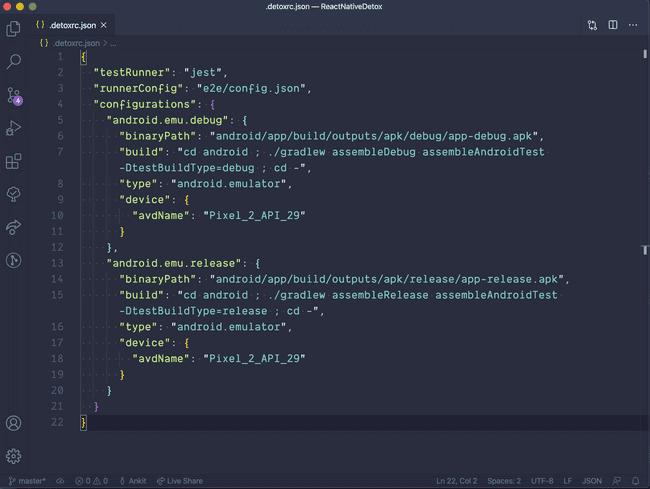
For me, it would look like the following -

We have added the detox configurations for the debug and release builds of our app. We told Detox about the binaryPath of our app and also the emulator which Detox will use to run the tests.
Adding Detox dependency to the Android project
- Open your root buildscript (i.e.
android/build.gradle) and register bothgoogle()anddetoxas repository lookup points in all projects:
allprojects {
    repositories {
        mavenLocal()
        maven {
            // All of React Native (JS, Obj-C sources, Android binaries) is installed from npm
            url("$rootDir/../node_modules/react-native/android")
        }
        maven {
            // Android JSC is installed from npm
            url("$rootDir/../node_modules/jsc-android/dist")
        }

        /* 👇 */
        maven {
            // All of Detox' artifacts are provided via the npm module
            url "$rootDir/../node_modules/detox/Detox-android"
        }

        google()

        /* 👆 */
        jcenter()
        maven { url 'https://www.jitpack.io' }
    }
}
We also need to update our minSdkVersion to 18 as required by detox and add Kotlin. As of now, the latest version of Kotlin is 1.3.70 so, I will use that.
In android/build.gradle file, add the following code -
buildscript {
    ext {
        buildToolsVersion = "28.0.3"
        ext.kotlinVersion = "1.3.70" /* 👈 */
        minSdkVersion = 18  /* 👈 */
        compileSdkVersion = 28
        targetSdkVersion = 28
    }
    repositories {
        google()
        jcenter()
    }

    dependencies {
        classpath("com.android.tools.build:gradle:3.5.2")
        classpath "org.jetbrains.kotlin:kotlin-gradle-plugin:$kotlinVersion" /* 👈 */

        // NOTE: Do not place your application dependencies here; they belong
        // in the individual module build.gradle files
    }
}
- We need to add the following dependencies in our app's buildscript. Open up
android/app/build.gradlefile and update thedependenciessection as follows -
dependencies {
   //...
   //...

    if (enableHermes) {
        def hermesPath = "../../node_modules/hermes-engine/android/";
        debugImplementation files(hermesPath + "hermes-debug.aar")
        releaseImplementation files(hermesPath + "hermes-release.aar")
    } else {
        implementation jscFlavor
    }
    androidTestImplementation('com.wix:detox:+') /* 👈 */
}
We also need to add the following to the defaultConfig subsection in the same file -
    defaultConfig {
        applicationId "com.demorntester"
        minSdkVersion rootProject.ext.minSdkVersion
        targetSdkVersion rootProject.ext.targetSdkVersion
        versionCode 1
        versionName "1.0"
        testBuildType System.getProperty('testBuildType', 'debug')  /* 👈 */
        testInstrumentationRunner 'androidx.test.runner.AndroidJUnitRunner' /* 👈 */
    }
- We need to create an Android Test class. Add the file
android/app/src/androidTest/java/com/reactnativedetox/DetoxTest.javawith the following code -
package com.reactnativedetox;

import com.wix.detox.Detox;

import org.junit.Rule;
import org.junit.Test;
import org.junit.runner.RunWith;

import androidx.test.ext.junit.runners.AndroidJUnit4;
import androidx.test.filters.LargeTest;
import androidx.test.rule.ActivityTestRule;

@RunWith(AndroidJUnit4.class)
@LargeTest
public class DetoxTest {

    @Rule
    // Replace 'MainActivity' with the value of android:name entry in
    // <activity> in AndroidManifest.xml
    public ActivityTestRule<MainActivity> mActivityRule = new ActivityTestRule<>(MainActivity.class, false, false);

    @Test
    public void runDetoxTests() {
        Detox.DetoxIdlePolicyConfig idlePolicyConfig = new Detox.DetoxIdlePolicyConfig();
        idlePolicyConfig.masterTimeoutSec = 60;
        idlePolicyConfig.idleResourceTimeoutSec = 30;

        Detox.runTests(mActivityRule, idlePolicyConfig);
    }
}
That's all the setup we need to do. We are now ready to write the tests!! 🚀
Writing our first test
Detox has already written some tests for us in the e2e/firstTest.spec.js file. But the tests will fail as our app starting screen is different and it won't be able to find elements by testID. Instead of updating our tests, for this tutorial we will update the contents of our App.js file according to the tests Detox has written. Copy over the contents from here to your App.js.
Now, we are ready to run the tests. There is just one little thing we need to do. We need to add scripts in our package.json file to run the detox tests.
Open up package.json file and add the following to the scripts section -
"scripts": {
  "android": "react-native run-android",
  "ios": "react-native run-ios",
  "start": "react-native start",
  "test": "jest",
  "lint": "eslint .",
  "build:android-debug": "detox build --configuration android.emu.debug", /* 👈 */
  "test:android-debug": "detox test --configuration android.emu.debug", /* 👈 */
  "e2e:android-debug": "yarn build:android-debug && yarn test:android-debug" /* 👈 */
},
Now, we need to start our react-native packager -
$ yarn start
And then in a new terminal run the following script to start running the tests -
$ yarn e2e:android-debug
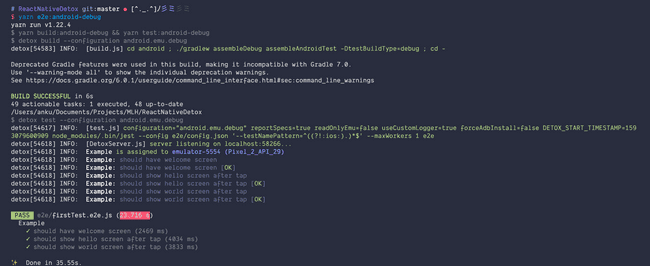
We are running the detox tests in debug mode. This is will take a while when running for the first time. After completing the tests should start running in your simulator and the output will be displayed in your terminal as following -

That's it! Now, you can start writing tests and exlpore detox. You can learn more about detox from their documentation here. The source code of this tutorial is available on Github.